In this Topic Hide
SIMPLIS transient analysis is similar to SIMetrix transient analysis.
| Stop Time | The finish time of a transient analysis. |
| Start Saving Data @ | The data required to create plots will start being output at this time. (Start plotting data @ under Plot data output has a similar function but is subtly different. See below for details) |
| Start plotting data @ |
This is the time at which the process of creating plot data is
started. This is similar to Analysis parameters $\rightarrow$ Start saving data
@ but subtly different. The process of generating plot data in
SIMPLIS is a two stage operation. When the simulation is
running it saves internal state data known as switching instance
data. The switching instance data then has to be transformed to
actual plot data. This latter process is known as Post Simulation
Processing or PSP. Analysis parameters $\rightarrow$ Start saving data
specifies the start time for switching instance data while Start
plotting data @ specifies when PSP begins. It is perfectly valid to
set Analysis parameters $\rightarrow$ Start saving data to zero so that all
switching instance data is saved, but to set Start plotting data @
to some later time. Here is an example to illustrate why you
might want to do this.
Suppose you are simulating a large circuit to 100mS but you are only interested in the last 20mS i.e. 80mS to 100mS. You could set Start saving data @ to 80mS to reduce the amount of data generated and also to speed up the run. However, after the run is complete, you look at the data and realise that you need to see what is happening from the start of the run. As no data at all was output from the start, the only thing to do is to rerun the entire simulation. If instead, however, you had set Start plotting data @ to 80mS but left Start saving data @ at 0, SIMPLIS will have saved the switching instance data and only the PSP process will be needed to create the final plot data. SIMPLIS is smart and is able to detect when you run the same simulation as before but with only changes to data output required. So, if you rerun the simulation with Start plotting data @ set to zero, SIMPLIS will only perform the PSP which is very much quicker than the whole simulation. |
| Stop Plotting Data @ | This is the time at which the process of creating plot data is stopped i.e. when the PSP operation (see above) completes. |
| Number of Plot Points | The total number of points to be generated. These will be evenly spaced within the start and stop times. |
Pressing the Advanced button opens the following dialog
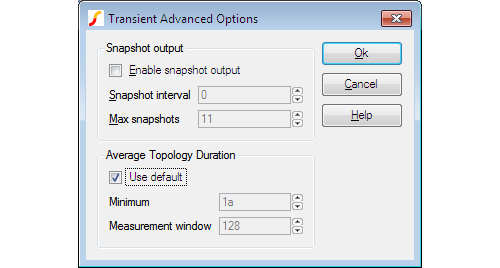
SIMPLIS has the ability to save its internal state in order to allow a run to be repeated from a certain time point. This allows a run to be continued from where it previously left off. (Similar to SIMetrix transient restart facility). The internal saved states are known as snapshots.
SIMPLIS always saves a snapshot at the end of every run so if you start a new run of the same circuit with a start time (Start saving data at t= ) equal to the stop time of the previous run, SIMPLIS will not need to rerun the start and instead will load the snapshot state. SIMPLIS will do this automatically.
The entries in this dialog section allow you to specify the saving of snapshots at other times as well as the end of a run. This might be useful if you wanted to restart a run at some before the end of the previous run.
| Enable snapshot output | Check this box to enable saving of snapshot data. (Snapshots are always saved at the end of a run) |
| Snapshot interval | This is the minimum duration between snapshots. |
| Max snapshots | This is the maximum number of snapshots that will be saved. This setting overrides Snapshot interval if there is a conflict. |
SIMPLIS calculates the average time it spends in each topology over a defined number of topologies. If this value falls below a minimum value the simulation aborts. The entries in the Average Topology Duration group define the parameters for this feature as follows:
| Minimum | If the average time falls below this threshold the simulation will abort |
| Measurement window | Number of windows over which the average time will be calculated |
The purpose of this is to resolve problems with the simulation apparently getting 'stuck' in situations where there are unexpected very high speed oscillations. If this happens you may wish to increase the minimum time or reduce the measurement window as appropriate.
|