Parts Management - Installing Models
In this topic:
Overview
The process of installing third party SPICE models has always been a fundamentally tricky one.
The difficulty has been associating the SPICE model - which is the electrical definition of the device - with the schematic symbol - which is the pictorial representation of it.
A model provides an electrical description of the device but not what schematic symbol to use nor what category it should be in the model library browser. SIMetrix is able to determine this for itself if the device is implemented using a .MODEL statement as all .MODELs refer to a particular type of device (NPN, NMOS, Diode etc.). Devices implemented as subcircuits however remain a problem as there is nothing in a .SUBCKT definition which tells SIMetrix what the device is. For example a three terminal regulator and a power MOSFET use identical syntax - SIMetrix can't tell the difference from the syntax alone. To resolve this SIMetrix is shipped with a database of known part numbers providing a named schematic symbol, part category and if relevant a pin mapping order. If the part is in the database, no further action is required by the user and the part will appear in the browser under the correct category and select the correct symbol.
If the model is not in the database and has 2 or 3 terminals, then SIMetrix will attempt to determine the type of device by performing some tests on the model using simulation. If this process is successful, SIMetrix will choose an appropriate schematic symbol without further action required.
If SIMetrix cannot determine what the device is then, in order to use the device on a schematic, you will need to provide the association information. You will be prompted for this information when you place a part on the schematic for the first time and this is often the most convenient method. However, there is also a method of providing the association information in bulk which is advantageous in many cases.
Procedure
There are two stages to installing SPICE models.
- Install the model itself so that the program knows where to look for it. This is simply a matter of dropping files or folders on the command shell. See Installing Electrical Model.
- Associate the model(s) with a schematic symbol. This process is often automatic and you don't need to do anything - see explanation in the Overview. If this is necessary, you will be prompted for the information required. See Placing New Model on Schematic.
Full Model Installation Procedure
The following is the full procedure for installing models including association if required.
Installing Electrical Model
- Open a suitable file manager program such as windows explorer in Windows. Locate the folder where your model files are located.
- Select the items you wish to install. You can also install a single file, multiple files an entire folder or multiple folders. You only thing you can't do is install files and folders at the same time.
- Make sure that the SIMetrix command shell is visible. If it is not visible, select menu .
- Pick up the items selected in 2. above and drop them into the message window of the command shell.
- If you installed individual files, you will see a message box asking you to confirm that you wish to continue. Just click OK. The model files are now installed.
-
If you drop folders a search will be made in those folders for SPICE models. The Add/Remove Models dialog will then be displayed as shown below:
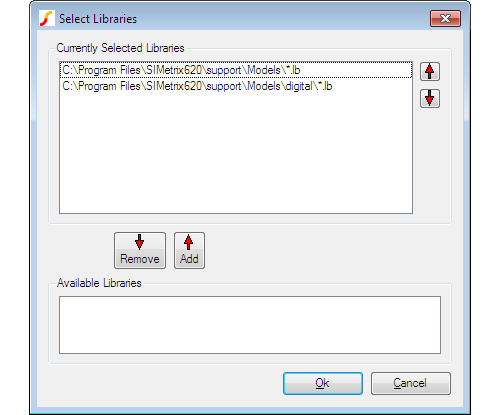 Select the items you wish to install in the lower box and transfer them to the upper box by pressing the Add button. You can also change the order of the items in the upper box. This affects the search order when a simulation is run. Click Ok. You will see a message displayed in the command shell 'Model library changed. Rebuilding catalogs, please wait...'. When finished the message 'Completed' will be displayed. The electrical model or models are now installed.
Placing New Model on Schematic
- You can now place models installed using the model library browser. Select schematic menu . You will see a dialog box similar to that shown for the Model Library Browser.
- On the left hand side select category '* Recently Added Models *' or if the models were installed more than 30 days ago, select '* All User Models *'. You should see the models you have installed listed on the right hand side. Select the device you wish to place the press Place.
- At this point, one of two things will happen. Either A schematic symbol will appear (possibly after a short delay) for you to place on the schematic sheet. If so, no further action is needed after placing the symbol. OR If SIMetrix is unable to identify a suitable schematic symbol for the model, the associate models and symbols dialog box will open. See next step.
-
The following dialog box will be displayed:
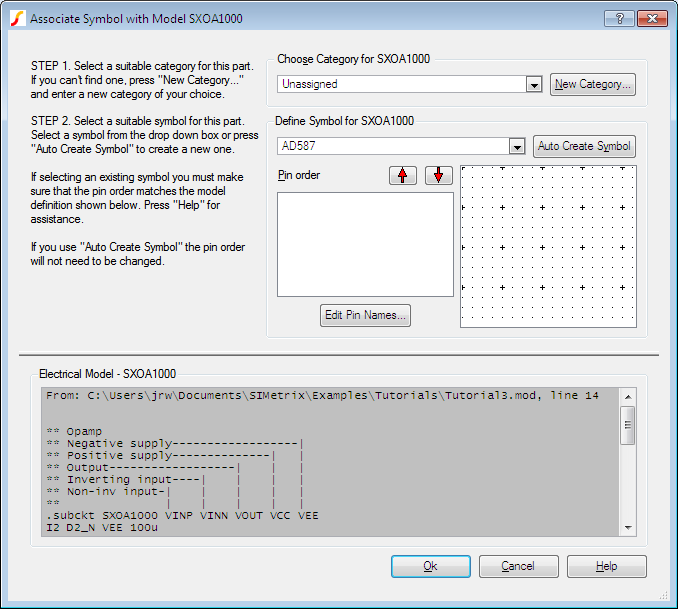
- Enter a suitable category for the part under Choose Category for xxx (where xxx is your model name). You can create a new category if desired by pressing New Category...
- Using the drop down box under Define Symbol for xxx , select a suitable symbol for your model. An image of the symbol will be displayed so you can check if it is appropriate. If no suitable symbol is available, press Auto Create Symbol and one will automatically be created. You can edit this symbol later if required.
- If you selected an existing symbol, you must check that the pin order matches that of the model itself. The model text is displayed under Electrical Model - xxx . If the pin order needs changing, use the up and down arrow keys to rearrange the pins as appropriate.
- Click Ok then place symbol as usual.
Note
Unknown file type xxx
is displayed when you drop a file, it means that no valid SPICE models were found in the file. It does not mean the file has the wrong extension. SIMetrix will accept any extension for model files with the exception of the extensions used for schematic or graph files (sch, sxsch and sxgph).
Removing Model Libraries
Select . A dialog box similar to that shown in Installing Electrical Model will be displayed but with the Available Libraries box empty. Select the devices you wish to remove from the Selected Libraries box.
| ◄ Using Model Library Browser | Parts Management - Configuring the Part Selector ▶ |