Parts Management - Configuring the Part Selector
In this topic:
Overview
The schematic part selector (see Part Selector) can be customised for your own application and preference. This can be done in two ways:
- Category editor. This is a GUI tool that allows you to move categories of parts to different positions in the hierarchy. It can also hide them altogether.
- Add, edit or remove individual items. There is no GUI to support this, but can be done by editing a catalog file.
Category Editor
The hierarchical structure of the part selector may be changed using the category editor.
All parts listed in the part selector are assigned category names. The category editor maps these category names to positions in the part selector hierarchy. For example, the category name NMOS maps to the location Discretes ???MATH???\rightarrow???MATH??? MOSFETs - N-channel. So by using the category editor, it is possible to reorganise how parts are displayed. You can also remove categories from the part selector by moving them to the path called ** HIDDEN **.
To open the category editor, select menu or . This will open the GUI as shown below:
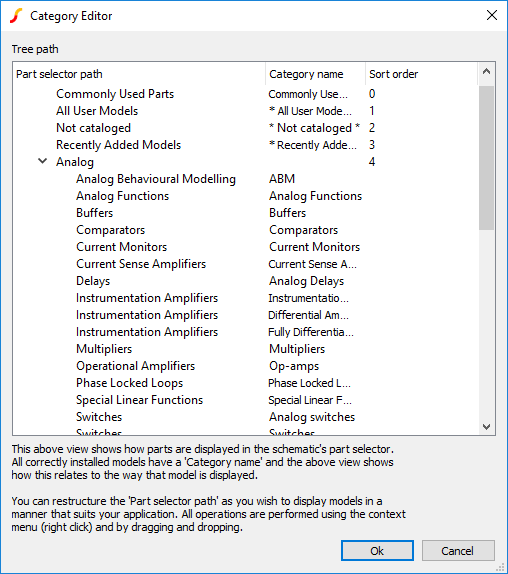
On the left hand side is a list of part selector paths. These are not individual parts but folders within the part selector that contain parts. On the right hand side are the category names. All parts displayed in the category editor have a category name.
With the category editor, you can:
- Rename folder entries in the part selector. Select the entry then right click menu Rename.
- Hide categories of parts that you don't use. Select the category you do not wish to show in the part selector. Drag and drop to the ** HIDDEN ** category path.
- Move categories to new locations in the hierarchy. You can move categories to another existing location by simply dragging and dropping it. You can also create new folders within the category editor to move categories to. To do this, select an existing category folder or [ROOT] then right click menu Create New Category Folder...
- Change order of categories. Select a category or category folder then right click menu Edit Sort Order. Enter a positive number - the small the number, the earlier in the list the item will be placed. Items without a defined sort order will be placed below items with a sort order. Items with the same sort order will be sorted alphabetically.
- Delete Categories and category folders. Note: you cannot delete categories and category folders that are built-in; you can only delete new categories or folders that you have created. If you want to remove items from the part selector, you can move the category to the ** HIDDEN ** folder. See item 2 above.
Editing the Part Selector Catalog
It is also possible to add your own parts to the part selector although there is no GUI available to do this.
- schematic_generic_parts_tree_journal_simetrix.cat, for SIMetrix mode or
- schematic_generic_parts_tree_journal_simplis.cat, for SIMPLIS mode.
Each line of this file defines a single entry in the part selector. The line is a semi-colon delimited list of fields that define various aspects of the part. See the following table for a definition of each of these fields.
| Field number | Function | Example |
| 0 | Name of part as it will appear in the place menu and hyperlink | DC Motor |
| 1 | Internal symbol name | dc_motor_symbol |
| 2 | unused - leave empty | |
| 3 | Category name | Motors |
| 4 | Name as it appears in the parts selector hierarchy | DC Motor |
| 5 | unused leave empty | |
| 6 | Script name - set to ps_simple | ps_simple |
| 7 | unused - leave empty | |
| 8 | Search keywords. Can add additional words to help user search. Separate multiple word with commas | electromechanical |
| 9 | Operation. Can be 'add', 'edit' or 'delete'. For creating new parts this must be 'add' | add |
Using the example as shown in the above table, the line would be:
DC Motor;dc_motor_symbol;;Motors;DC Motor;;ps_simple;;electromechanical;add
You can create as many lines like the above as you wish, but it is important that each occupies a single line in the file.
The file should be placed at this location:
C:\Users\username\AppData\Roaming\SIMetrix Technologies\ SIMetrixnnn\devdb\user\
- username is your login account name
- nnn is the SIMetrix version as an integer, e.g. 800 for version 8.
- ver is the SIMetrix version in the form 8.00
| ◄ Parts Management - Installing Models | Parts Management - Advanced Topics ▶ |