SPICE Model Installation Process
All SPICE models are installed using a common, two-step procedure:
If you already have a model file, you can use that file for these procedures. Otherwise, a sample file with three SPICE MOSFET models is available for download in Step 1. The three models in this sample file provide three different methods you can use to create the associations:
- The first model, example_model_1, is a definition that SIMetrix recognizes and automatically categorizes and associates with a symbol. For more information, see 2.1_Automatically associate a model with a category and symbol.
- The second model, example_model_2, requires you to select the model-library category and the symbol name. For more information, see 2.2 Manually associate a model with a category and symbol.
- The third model, example_model_3, has the associations embedded in the text file and can be used immediately after installation. This model-to-symbol association is defined in the model file on a single line that must appear inside the subcircuit definition that begins with the .SUBCKT line and ends with the .ENDS line. for more information, see 2.3 Embed the association in the model definition.
In this topic:
This tutorial also includes a method to remove an association. See Undo the model-to-symbol associations.
Step 1: Install the models
To use the sample models, follow these steps:
- Right click the following link: model_examples.txt .
- Select Save as..., and navigate to a convenient location to save the model for use in the next procedure..
To install either the example model file or your own model file, follow these steps:
- Open Windows Explorer to the directory where you saved the model file and position the SIMetrix/SIMPLIS command shell so that you have access to both the Windows Explorer window and the command shell.
- Drag and drop the file into the command shell.
- Click OK at the prompt, confirming that you want to install the file.Result: The command shell displays a message that the model library has changed and that the catalog rebuild is complete. If no message appears in the command shell, these models, most likely, already exist in the library.
If you installed your own model file, one of the following three sections will apply to the model-symbol association process. Simply follow these sections to see which applies to your model. A different example model is used in each section. Substitute your model name for the supplied model name in each procedural step.
Step 2: Associate model with category and symbol
This section describes three methods for associating a model with a category and symbol:
- 2.1 Automatically associate a model with a category and symbol
- 2.2 Manually associate a model with a category and symbol
- 2.3 Embed the association in the model definition
2.1 Automatically associate a model with a category and symbol
The first model, example_model_1, is one that SIMetrix can automatically associate with a model-library category and a symbol name.
Create a new schematic and then follow these steps:
- From the schematic menu bar, select .Result: The Select Device dialog appears with the Recently Added Models category highlighted in the panel on the left. The new models from model_examples.txt appear in the selection pane on the right.
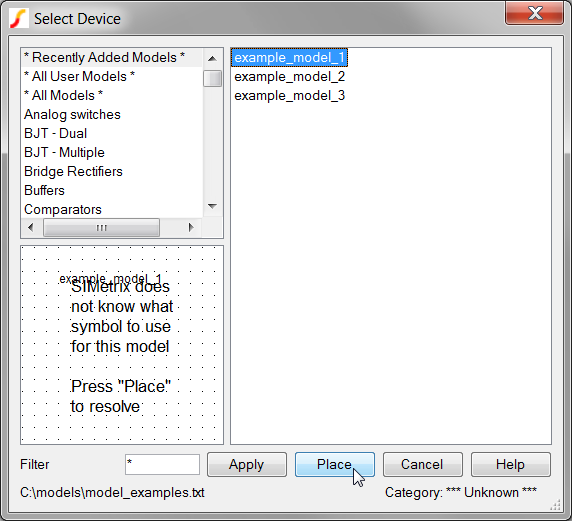
- Highlight example_model_1.Result: The following text appears in the lower left pane:
SIMetrix does not know what symbol to use for this model.
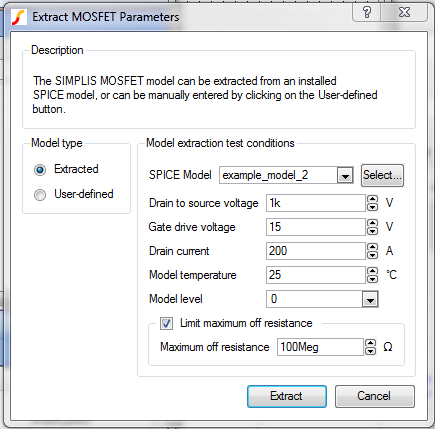
- Click the Place button. Result: The Extract MOSFET Parameters dialog opens with default test conditions for this type of model. You can set these default test conditions in the SIMPLIS Options.
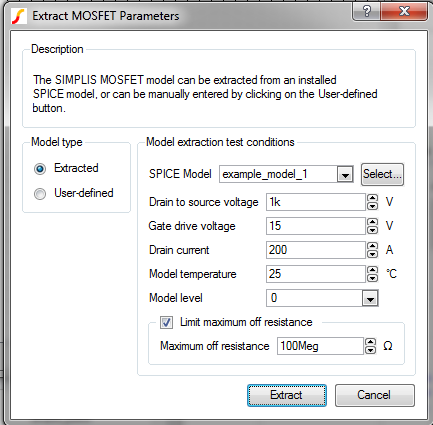
- Make the appropriate changes to the test conditions for this model, and then
click Extract.Result: A progress bar appears and then the mouse cursor turns to the symbol and is ready to be placed on the schematic.
- Click to put the associated symbol in an appropriate place on your schematic.
For this type of model, no additional steps are required because SIMetrix is able to automatically categorize and associate the model with a symbol. This model example is now associated with an nmos_sub symbol and is categorized as NMOS in the SIMetrix/SIMPLIS library.
2.2 Manually associate a model with a category and symbol
The second model, example_model_2, falls into the class of models for which SIMetrix cannot determine the association and you must, therefore, select a category and an associated symbol.
To associate this model with a library category and a symbol, follow these steps:
- From the schematic menu bar, select
Result: The Select Device dialog appears.
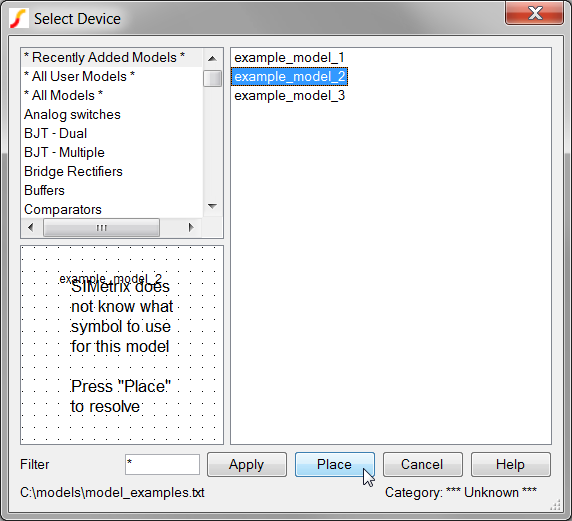
- Highlight example_model_2.Result: The following text appears in the lower left pane:
SIMetrix does not know what symbol to use for this model.
- Click the Place button.Result: A dialog opens with a list of the categories and symbols that are required by SIMPLIS for the common semiconductor devices.
Table 1. Common SPICE Model Types, Categories, and Symbol Names
Model Type Model Library Category Symbol N-Channel MOSFET NMOS NMOS 3 Terminal P-Channel MOSFET PMOS PMOS 3 Terminal NPN Bipolar Transistor NPN NPN PNP Bipolar Transistor PNP PNP Diodes Diodes Junction Diode Schottky Diodes Schottky Diodes Schottky Zener Diodes Zeners Zener N-Channel JFET N-Channel JFET N-Channel JFET P-Channel JFET P-Channel JFET P-Channel JFET N-Channel GaN MOSFET N-Channel JFET N-Channel JFET P-Channel GaN MOSFET P-Channel JFET P-Channel JFET Insulated Gate Bipolar Transistor IGBTs IGBT - Click Close.
or
To avoid seeing this dialog again, check "Don't show this message again." and then click Close.Result: The Associate Models with Symbols dialog appears.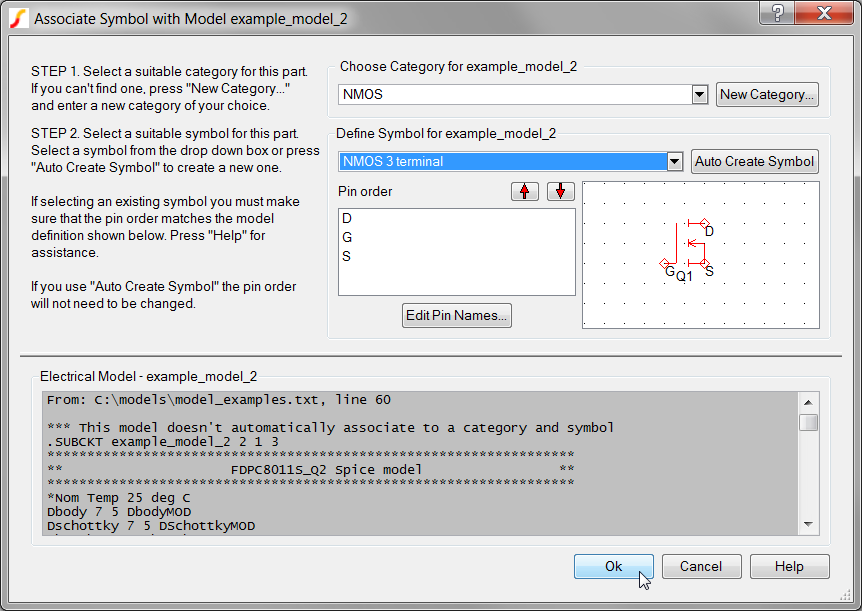
- From the Choose Category... drop-down menu, select NMOS for this
model example. Tip: To locate the category more quickly, type the first few letters of the category to move to that section of the list.
- From the Define Symbol drop-down menu, select NMOS 3 Terminal.Tip: To locate the symbol more quickly, type the first few letters of the symbol to move to that section of the list and then use the scroll bar or arrow key if necessary to move down the list.
- Click OK.Result: The Extract MOSFET Parameters dialog opens with default test conditions for this type of model.
- Make the appropriate changes to the test conditions for this model, and then
click Extract.Result: A progress bar appears and then the mouse cursor turns to the symbol and is ready to be placed on the schematic.
- Click to put the associated symbol in an appropriate place on your
schematic.Result: This model example is now is categorized as NMOS in the SIMetrix/SIMPLIS library and associated with the symbol for an NMOS 3 Terminal (nmos_sub).
2.3 Embed the association in the model definition
The third model, example_model_3, has the following extra line in the model definition just after the .SUBCKT information:
*#ASSOC Category=NMOS Symbol=nmos_sub
- The first portion of the line, *#ASSOC, is a keyword that tells SIMetrix to expect a model-library category and a symbol name on the same line.
- The second portion of the line, Category=NMOS, defines the model-library category.
- The third portion, Symbol=nmos_sub, defines which symbol name to
associate with this model.Note: Since this line is a comment, it has no electrical significance in the model.
Because the model is already associated with a model-library category and symbol, it can be placed on a schematic directly.
- From the schematic menu bar, select .
- Highlight example_model_3. Result: The symbol appears in the lower-left pane of the Select Device dialog, indicating that the model has a symbol association.
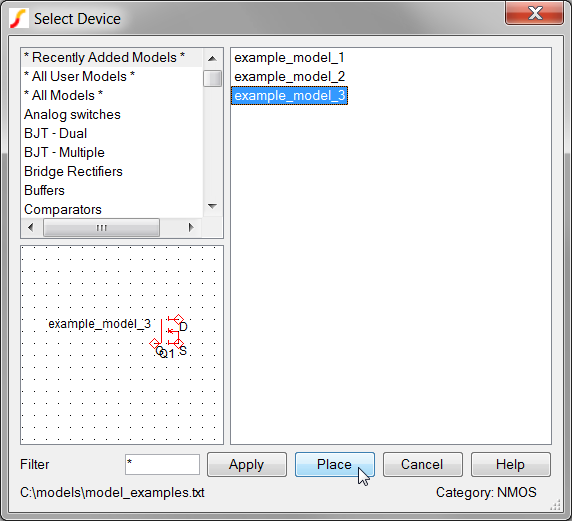
- Click the Place button.Result: The Extract MOSFET Parameters dialog opens with default test conditions for this type of model.
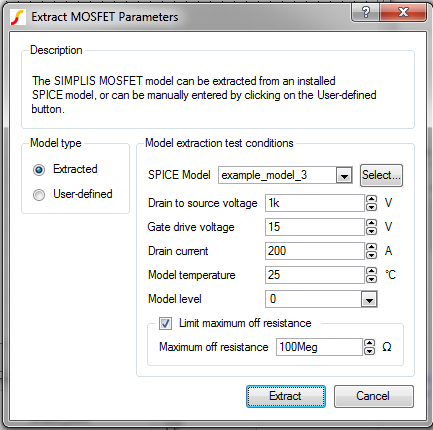
- Make the appropriate changes to the test conditions for this model, and then
click Extract. Result: A progress bar appears and then the mouse cursor turns to the symbol and is ready to be placed on the schematic. The mouse cursor turns into the symbol and is ready to be placed on the schematic.
- Click to put the associated symbol in an appropriate place on your
schematic.Result: The MOSFET is now placed on the schematic without any intervention by SIMetrix.
To save and close your schematic, select and select a convenient location to store the schematic file.
Undo the model-to-symbol associations
At times, models are accidentally associated with the wrong symbols. Although no built-in support is available for removing associations within SIMetrix, you can do this manually with a text editor. The user-defined model-to-symbol associations are stored in a text file in the Application Data directory.
To edit user_v2.cat and remove associations for the two models that did not have associations embedded in the file, follow these steps:
- Open Windows Explorer.
- Choose an appropriate path from the following table:
If your version is ... Use this path ... SIMetrix/SIMPLIS Intro, version 7.0 %appdata%\SIMetrix Technologies\SIMetrixIntro700\devdb\user SIMetrix/SIMPLIS full version 7.00 %appdata%\SIMetrix Technologies\SIMetrix700\devdb\user Other versions Replace the "SIMetrix700" with the appropriate version number; for example, for version 7.10, use "%appdata%\SIMetrix Technologies\SIMetrix710\devdb\user" - Paste the appropriate path identified in step 2 into the file path field at the top of the Windows Explorer window.
- To open the user_v2.cat file, select the file, right click, and then select Open with....
- Choose a text editor, such as Notepad.Result: The file opens in a text editor.Note: If both example_model_1 and example_model_2 were installed, the user_v2.cat file would have these two entries:
example_model_1,3;nmos_sub;;NMOS;;;
example_model_2,3;nmos_sub;;NMOS;;;
- To remove an association, delete the entire line from this file and then save
it.Note: The embedded associations are not stored in this file, rather the association is stored in the model library file.