4.4 Protecting Your Intellectual Property - Model Encryption
The ability to render a model as ASCII text and then encrypt that text-based model for distribution to a wider audience opens the door to allowing public use of models without disclosing your IP. This key technology is widely used with many IC vendors distributing encrypted models for use with SIMPLIS. In this topic you will learn how to turn models into ASCII text, and how to encrypt these models. The automated processes built into SIMetrix/SIMPLIS make this process very easy.
To download the examples for Module 4, click Module_4_Examples.zip
In this topic:
Key Concepts
This topic addresses the following key concepts:
- Hierarchical schematic components can be converted to a ASCII text model.
- These models can be encrypted for delivery to customers without releasing your IP.
What You Will Learn
In this topic, you will learn the following:
- How to easily convert a hierarchical schematic design to use an ASCII or encrypted ASCII model.
- How the POP Trigger gate can be inside the ASCII or encrypted ASCII model.
Getting Started
A set of ASCII model library creation scripts have been incorporated into SIMetrix/SIMPLIS. These scripts reduce the effort required to create ASCII model libraries to a single click operation. In this topic you will create ASCII and encrypted ASCII model libraries for two schematic component files, create their associated symbols, and convert the schematic over to use the ASCII models.
- Open the schematic 4.2_LLC_Closed_Loop.sxsch.
- Select U2, the optocoupler defined by the schematic component Gen_Opto.sxcmp.
- Right click to bring up the context menu, and select the menu option: Create
ASCII Model from .sxcmp.Result: A new schematic briefly appears, and is closed. Behind the scenes SIMetrix/SIMPLIS has created a plain text model library file, then encrypted that model library file, outputting a second model library text file. The two files which are created are:
- Gen_Opto.lb
- Gen_Opto_encrypted.lb
Created ASCII plain text library file:
C:\Training\Module_4_Examples\Gen_Opto.lb

Created ASCII encrypted text library file:
C:\Training\Module_4_Examples\Gen_Opto_encrypted.lb
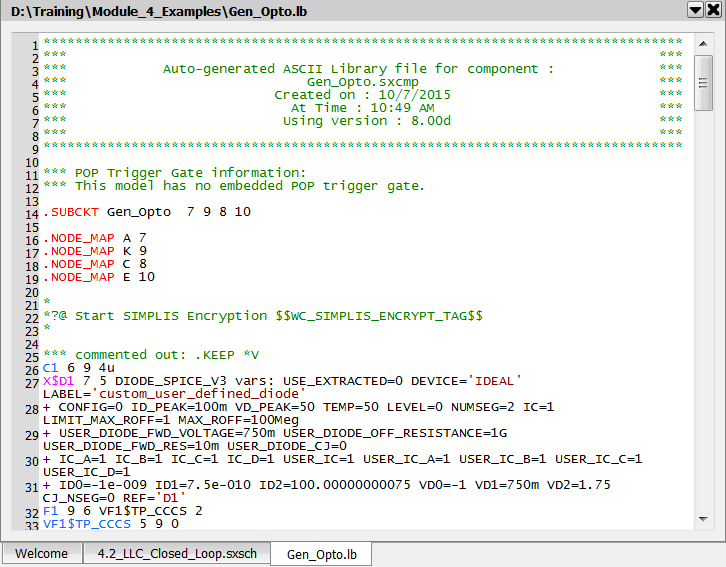
Finally, the File View is updated with the new files. - In the File View, double click on the ASCII plain text model library file:
Gen_Opto.lb.Result: The ASCII model library Gen_Opto.lb opens in the netlist editor:
- Repeat the process to open the Gen_Opto_encrypted.lb file.Result: The encrypted model for the Gen_Opto.sxcmp schematic component opens in the netlist editor.
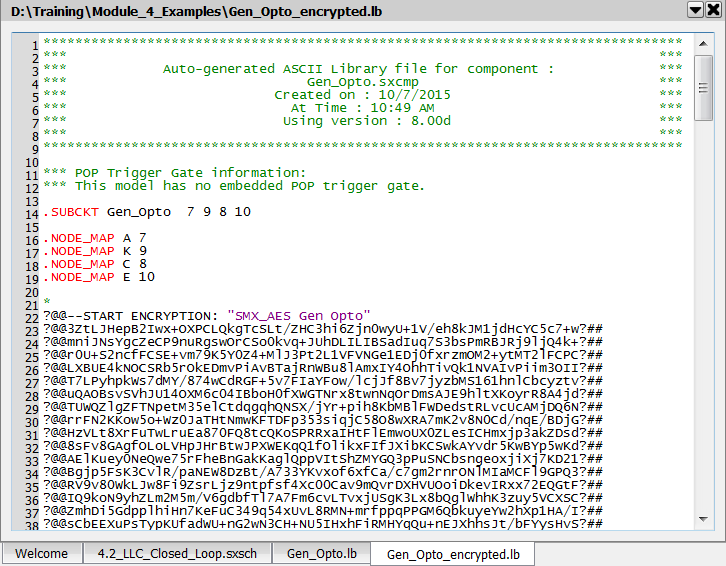
Notice that the files are identical up to line #22 where the encryption start tag is located. The encryptor reads the plain text Gen_Opto.lb library file and encrypts all text between the start and end tags, generating the encrypted model library file Gen_Opto_encrypted.lb.
Discussion
In the Getting Started section you created ASCII text versions of the Gen_Opto schematic component file. The resulting ASCII text models are exact replicas of the model described by the schematic, including any parameterization. Also, these ASCII text models are significantly more robust than a schematic component based model, especially if the encrypted version is used. For these reasons, plain or encrypted ASCII text models are used for distribution to a wide audience.
The ASCII model generation scripts automatically add the encryption start tag (lines 21-23 above) and end tag to the plain text model library. Once the encryption tags are added, the model is ready for encryption, and as the tags are comments, the plain text library file is also simulation ready. In the final step of ASCII model generation, the stand-alone AES encryptor is called on the plain text library file to generate an encrypted library file. The entire process takes at most a few seconds, and your intellectual property never leaves your computer.
Types of Encryption
SIMPLIS supports several encryption schemes. The stand-alone AES encryptor is a command line executable utility located in the bin directory of your SIMetrix/SIMPLIS installation. You used this encryptor in the Getting Started section of this topic. Another encryption scheme is used for the private label SIMetrix/SIMPLIS products, such as EE-Sim. These models are encrypted by SIMPLIS technologies from the same plain text source file created in the Getting Started section.
Converting a Schematic to Use ASCII Models
Modifying schematics to use ASCII models is easy with the new ASCII model creation menu items. In the following exercises, you will create both ASCII model libraries and symbols which call those ASCII models.
Exercise #1: Create ASCII Model and Symbol for Optocoupler
In this exercise, you will create the ASCII model library and a symbol which calls the ASCII model for the optocoupler U2.
- Close both model files.
- Open the schematic 4.2_LLC_Closed_Loop.sxsch, if its closed.
- Select U2, the optocoupler defined by the schematic component Gen_Opto.sxcmp.
- Right click to bring up the context menu, and select the menu option: Create
ASCII Model and Symbol from .sxcmp.Result: As in the Getting Started section, the program creates the ASCII model; however, an additional step creates a copy of the symbol contained in the schematic component file and after modifying the symbol to call the ASCII model, prompts you on what to do with the symbol.
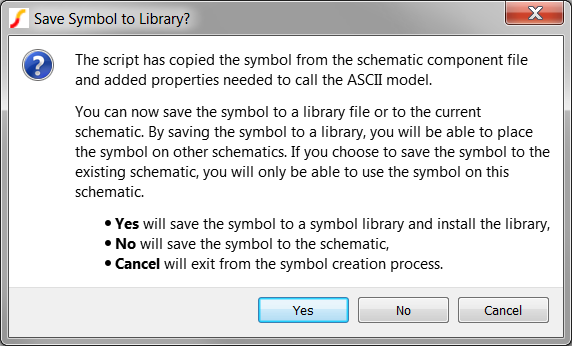
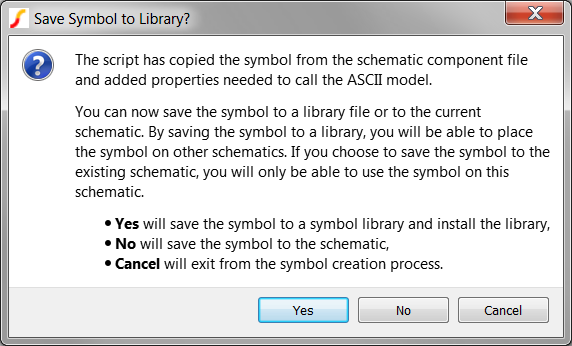
- Click on the Yes button to save the symbol to a library file, then install
the symbol library file.Result: SIMetrix/SIMPLIS installs the symbol library file and reports to the shell what actions have been completed, and what the next steps are:
Created ASCII plain text library file:
D:\Training\Module_4_Examples\Gen_Opto.lb

Created ASCII encrypted text library file:
D:\Training\Module_4_Examples\Gen_Opto_encrypted.lb

Saved the symbol to the symbol library file:
D:\Training\Module_4_Examples\Gen_Opto.sxslb

And installed the symbol library file.

To use the newly created ASCII definition:
------------------------------------------
1) On the current schematic, execute the menu : File->Save Schematic As... and choose a new file name. You will then modify this schematic to use the ASCII model library.

2) On the newly saved schematic, delete the original hierarchical symbol for U2, and press Q to replace the symbol with the ASCII model library version.

3) Include the ASCII model library in the simulation. One easy way to do this is with a .include statement.

Copy one of the following and paste into the F11 window after the .SIMULATOR DEFAULT statement.

To use the plain ASCII text version,
.include Gen_Opto.lb

To use the encrypted ASCII text version,
.include Gen_Opto_encrypted.lb
Exercise #2: Modify Schematic to Use New Symbol
In the first exercise you created a symbol and two ASCII text model library files; however, the scripts do not change the actual schematic. In this exercise you will configure the schematic to use the new optocoupler symbol which calls the encrypted ASCII text model library.
- From the schematic menu, select , and save the file to 4.3_LLC_Closed_Loop_ASCII.sxsch, in the same directory: C:\Training\Module_4_Examples\
- First, you need to replace the symbol for U2 because the existing symbol
calls the schematic component file Gen_Opto.sxcmp, but you need a symbol
which calls the ASCII model. To replace the symbol, follow these steps:
- Select U2, and press the Del key to delete the old symbol.
- Press Q to place the new symbol. Move the mouse cursor to the location where the previous symbol for U2 was located.
- Press F6 to mirror the symbol.
- Click the left mouse button to place the new symbol in the exact location
where the old optocoupler symbol was located.Result: The newly placed symbol calls the ASCII model when the design is simulated.
- Next, you need to make the ASCII model available to the simulator by following
these steps:
- Copy the text from the SIMetrix/SIMPLIS command shell:
.include Gen_Opto_encrypted.lb
- Press F11 to open the command (F11) window.
- Paste the copied text in the command (F11) window below the
.SIMULATOR DEFAULTstatement.Note: Since there are variables in the F11 window, you can paste this line at the very bottom of the command (F11) window.
- Copy the text from the SIMetrix/SIMPLIS command shell:
- Run the simulation by pressing F9.Result: The simulation runs, using the encrypted ASCII model.
- To verify the deck file has the encrypted model content, follow these steps:
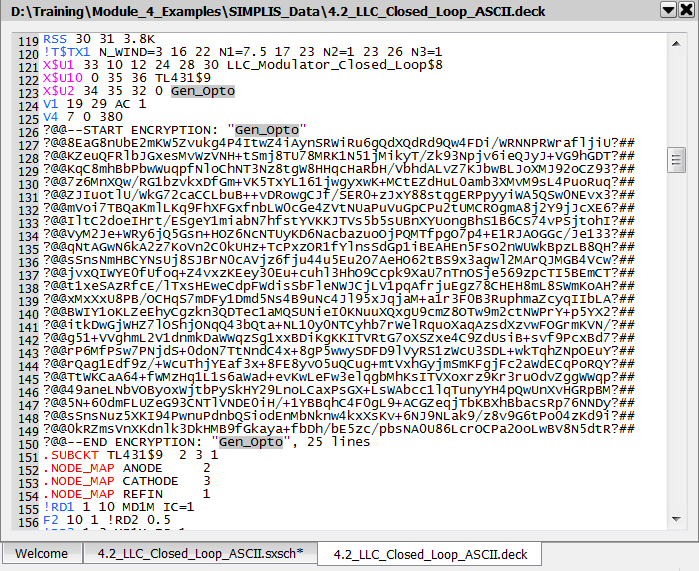
- From the menu bar, select .Result: The deck file opens in the netlist editor.
- Use the shortcut key Ctrl+F to open the search dialog.
- Type Gen_Opto in the search box.
- Click on the Find Next button.Result: The document scrolls to line #123 where the instantiation line for U2 is located. The encrypted subcircuit definition is below, starting with the comment line on line #126.
- From the menu bar, select .
Exercise #3: Convert the LLC Modulator to Use ASCII Model
In this exercise you will repeat the ASCII model/symbol creation process for the LLC Modulator block. You will see an additional step is be required to prepare the ASCII schematic to run.
- Select U1, the LLC Modulator defined by the schematic component LLC_Modulator_Closed_Loop.sxcmp.
- Right click to bring up the context menu, and execute the menu option: Create
ASCII Model and Symbol from .sxcmp.Result: As in the first exercise, the ASCII model libraries and the symbol are created. TThe same dialog opens, and you will want to click Yes.
- Click on the Yes button to install the symbol library file.Result: SIMetrix/SIMPLIS installs the symbol library file and reports to the shell what actions have been completed, and what the next steps are.
- To replace the symbol for U1 with the same procedure as with the
optocoupler, U2, follow these steps:
- Press the Del key to delete U1.
- Press Q to place the new symbol. Move the mouse cursor to the location where the previous symbol for U1 was located.
- Click the left mouse button to place the new symbol in the exact location
where the old LLC Modulator symbol was located.Result: The newly placed symbol calls the ASCII model when the design is simulated.
- To make the encrypted ASCII model available to the simulator:
- Copy the text from the text from the SIMetrix/SIMPLIS command shell:
.include LLC_Modulator_Closed_Loop_encrypted.lb
- Press F11 to open the command (F11) window.
- Paste the copied text in the command (F11) window below the .include Gen_Opto_encrypted.lb statement that you added in the second exercise.
- Copy the text from the text from the SIMetrix/SIMPLIS command shell:
- Run the simulation by pressing F9.Result: The simulation fails because the design has no POP Trigger schematic device. In the process of converting the LLC Modulator block to an ASCII model, the schematic POP Trigger device was also converted to ASCII text. As a result, the program cannot find the POP Trigger schematic device (a symbol) and the following error message opens:
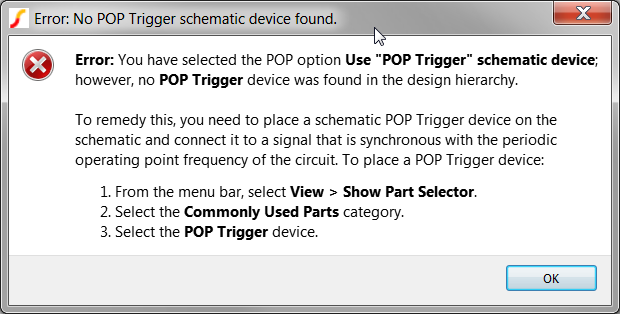
In the next exercise you will identify the correct POP Trigger gate - this gate is located in the ASCII model for the LLC Modulator.
Exercise #4: Assign POP Trigger Gate
When the ASCII model for the LLC Modulator was created in the third exercise, the program searched out the POP Trigger gate information and placed the trigger gate information in the library file as a comment. In this exercise you will copy that information and change the POP Analysis to use this fixed trigger gate.
- In the File View, double click on the encrypted text model library
LLC_Modulator_Closed_Loop_encrypted.lb.Result: The file opens in the netlist editor.
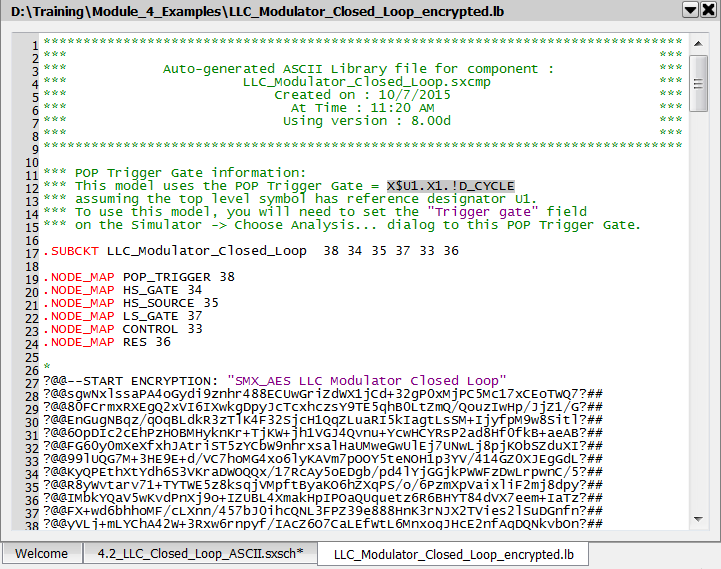
- From the model library file, copy the trigger gate information (X$U1.X1.!D_CYCLE), as highlighted above.
- Navigate to the SIMetrix/SIMPLIS schematic window.
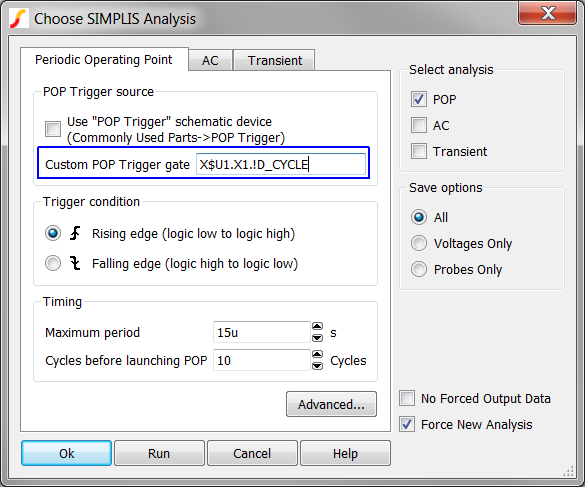
- Press F8 or select the schematic menu: Choose Analysis... to open the Choose SIMPLIS Analysis Dialog.
- On the POP tab, Uncheck the Use "POP Trigger" schematic device check box.
- Paste the trigger gate information into the Custom POP Trigger gate field.
Result: The modified dialog should appear as follows:
- Click on the Run button.Result: The simulation executes using the encrypted ASCII text models for the LLC Modulator and the optocoupler.
Wrapping Up the Model For Distribution
There are several ways to wrap up a model for distribution to customers. In the exercises you used a .include statement to include the model library file in the simulation. The netlist preprocessor will insert the entire model library file into the simulation deck when the design is run. You could also simply copy and paste the model text into the F11 window in place on the .include statement, as discussed in Including Models in the Command (F11) Window. This will reduce the design to just the single top level test schematic, in this case, the file you created: 4.3_LLC_Closed_Loop_ASCII.sxsch. This is a common way to distribute models.
Symbol Libraries
Symbol libraries were created for the LLC Modulator and the optocoupler blocks during the exercises. When you placed the symbols on the schematic using the keyboard shortcut Q, a copy of the symbol was made and placed in the schematic file. If you intend to distribute the design to individual customers, you will not need the symbol libraries; however, if the models and symbols are intended for general release in SIMetrix/SIMPLIS, the symbol libraries are required. You can collect individual symbols from the multiple symbol libraries using the symbol manager. The SIMetrix/SIMPLIS menu bar will open the Symbol Manager. Also, its important to remember the symbol libraries were installed during the model creation process. You can remove the symbol libraries when they are no longer needed with the Symbol Manager. See also: Installing and Removing Symbol Libraries.
Model Libraries
As with the symbol libraries, you will only need the model library files to include in the simulation using the .include statement, or for general release in SIMetrix/SIMPLIS. The ASCII model creation scripts create a single file per model, you can manually collect the individual models to a single model library file for general release.
Conclusions and Key Points to Remember
- Converting models to ASCII text allows the models to be encrypted for delivery to customers without releasing your IP.
- The Create ASCII Model and Symbol from .sxcmp menu item converts a hierarchical schematic design to a plain text ASCII and encrypted text ASCII model and creates a symbol to call either text-based model.
- The POP Trigger gate can be inside the ASCII or encrypted ASCII model. You can explicitly define the POP trigger gate on the Choose SIMPLIS Analysis dialog.